简单示例
导入 Jar 包
1
2
3
4
5
6
7
8
| spring-aop-4.0.0.RELEASE.jar
spring-beans-4.0.0.RELEASE.jar
spring-context-4.0.0.RELEASE.jar
spring-core-4.0.0.RELEASE.jar
spring-expression-4.0.0.RELEASE.jar
commons-logging-1.1.3.jar
spring-web-4.0.0.RELEASE.jar // 核心
spring-webmvc-4.0.0.RELEASE.jar // 核心
|
配置 web.xml
需要在 web.xml 中配置 SpringMVC 的核心(前端)控制器 DispatherServlet。作用是加载 SpringMvc 的配置文件。如下的配置方式 DispatcherServlet 会自动加载配置文件,此时的配置文件有默认的位置和名称。默认位置是 WEB-INF 下,默认名称是 <servlet-name> 的名称加 -servlet.xml。例如以下配置文件的名称为 springMvc-servlet.xml。当加载了配置文件后,SpringMVC 就会扫描组件找到控制层。
servlet.xml 配置如下
1
2
3
4
5
6
7
8
9
| <servlet>
<servlet-name>springMvc</servlet-name>
<servlet-class>org.springframework.web.servlet.DispatcherServlet</servlet-class>
</servlet>
<servlet-mapping>
<servlet-name>springMvc</servlet-name>
<url-pattern>/</url-pattern>
</servlet-mapping>
|
SpringMVC 配置如下
1
2
3
4
5
6
7
8
9
10
11
12
13
14
15
16
17
18
19
20
| <?xml version="1.0" encoding="UTF-8"?>
<beans xmlns="http://www.springframework.org/schema/beans"
xmlns:xsi="http://www.w3.org/2001/XMLSchema-instance"
xmlns:context="http://www.springframework.org/schema/context"
xsi:schemaLocation="http://www.springframework.org/schema/beans http://www.springframework.org/schema/beans/spring-beans.xsd
http://www.springframework.org/schema/context http://www.springframework.org/schema/context/spring-context-4.0.xsd">
<context:component-scan base-package="com.atguigu.controller"></context:component-scan>
<bean id="viewResolver" class="org.springframework.web.servlet.view.InternalResourceViewResolver">
<property name="prefix" value="/WEB-INF/view/"></property>
<property name="suffix" value=".jsp"></property>
</bean>
</beans>
|
创建 POJO(普通的 java 类),在此类上加上 @Controller 注解,SpringMVC 就会将此类作为控制层进行加载,让其处理请求相应。
在控制层中,需要在方法上设置 @RequestMapping(value="路径")注解。 SpringMVC 就是将此路径与控制层中的方法进行匹配。此时请求路径为 localhost:8080/项目名/路径
1
2
3
4
5
6
7
8
9
10
11
12
| package com.atguigu.test;
import org.springframework.stereotype.Controller;
import org.springframework.web.bind.annotation.RequestMapping;
@Controller
public class TestController {
@RequestMapping("hello")
public String hello() {
return "success";
}
}
|
处理请求的方法会返回一个字符串,即视图名称。最终通过配置文件中的视图解析器实现页面跳转。即 prefix + 视图名称 + suffix 为最终跳转的页面路径。
代码地址
RequestMapping
支持的属性
- @RequestMapping 可以加上类上,也可以加在方法上。表示设置请求映射,把请求和控制层中的方法设置映射关系。当请求路径和 value 属性值一致时,则该注解所标注的方法就是处理请求的方法。
- value 属性可以设置访问地址。
- method 属性可以设置请求方式。
- params 和 headers支持简单的表达式:param1: 表示请求必须包含名为 param1 的请求参数。!param1: 表示请求不能包含名为 param1 的请求参数。param1 != value1: 表示请求包含名为 param1 的请求参数,但其值不能为 value1。{“param1=value1”, “param2”}: 请求必须包含名为 param1 和param2 的两个请求
1
2
3
4
5
6
7
8
9
10
11
12
13
14
15
16
17
18
19
20
21
22
23
24
25
26
27
28
29
30
31
32
33
34
35
36
37
| package com.atguigu.controller;
import org.springframework.stereotype.Controller;
import org.springframework.web.bind.annotation.RequestMapping;
import org.springframework.web.bind.annotation.RequestMethod;
@Controller
@RequestMapping("/mvc")
public class TestController {
@RequestMapping(value = "test", method = RequestMethod.POST)
public String testPOST() {
return "success";
}
@RequestMapping(
value = "test",
method = RequestMethod.GET,
params = {"username", "age!=12"},
headers = {"Content-Type!=text/css"}
)
public String testGET() {
return "success";
}
}
|
Ant 风格资源地址
1
2
3
| ?:匹配文件名中的一个字符
*:匹配文件名中的任意字符
**:匹配多层路径
|
例子:
1
2
3
4
5
6
7
8
| /user/*/createUser
匹配 /user/aaa/createUser、/user/bbb/createUser 等 URL
/user/**/createUser
匹配 /user/createUser、/user/aaa/bbb/createUser 等 URL
/user/createUser??
匹配 /user/createUseraa、/user/createUserbb 等 URL
|
PathVariable
@PathVariable 注解可以将请求URL路径中的请求参数,传递到处理请求方法的入参中。
1
2
3
4
5
6
7
8
9
10
11
12
13
14
15
16
17
| package com.atguigu.controller;
import org.springframework.stereotype.Controller;
import org.springframework.web.bind.annotation.PathVariable;
import org.springframework.web.bind.annotation.RequestMapping;
import org.springframework.web.bind.annotation.RequestMethod;
@Controller
@RequestMapping("/mvc")
public class TestController {
@RequestMapping(value = "/test/{id}/{username}", method = RequestMethod.GET)
public String testGET(@PathVariable("id") Integer id, @PathVariable("username") String username) {
System.out.println("id:" + id + ", username:" + username);
return "success";
}
}
|
HiddenHttpMethodFilter
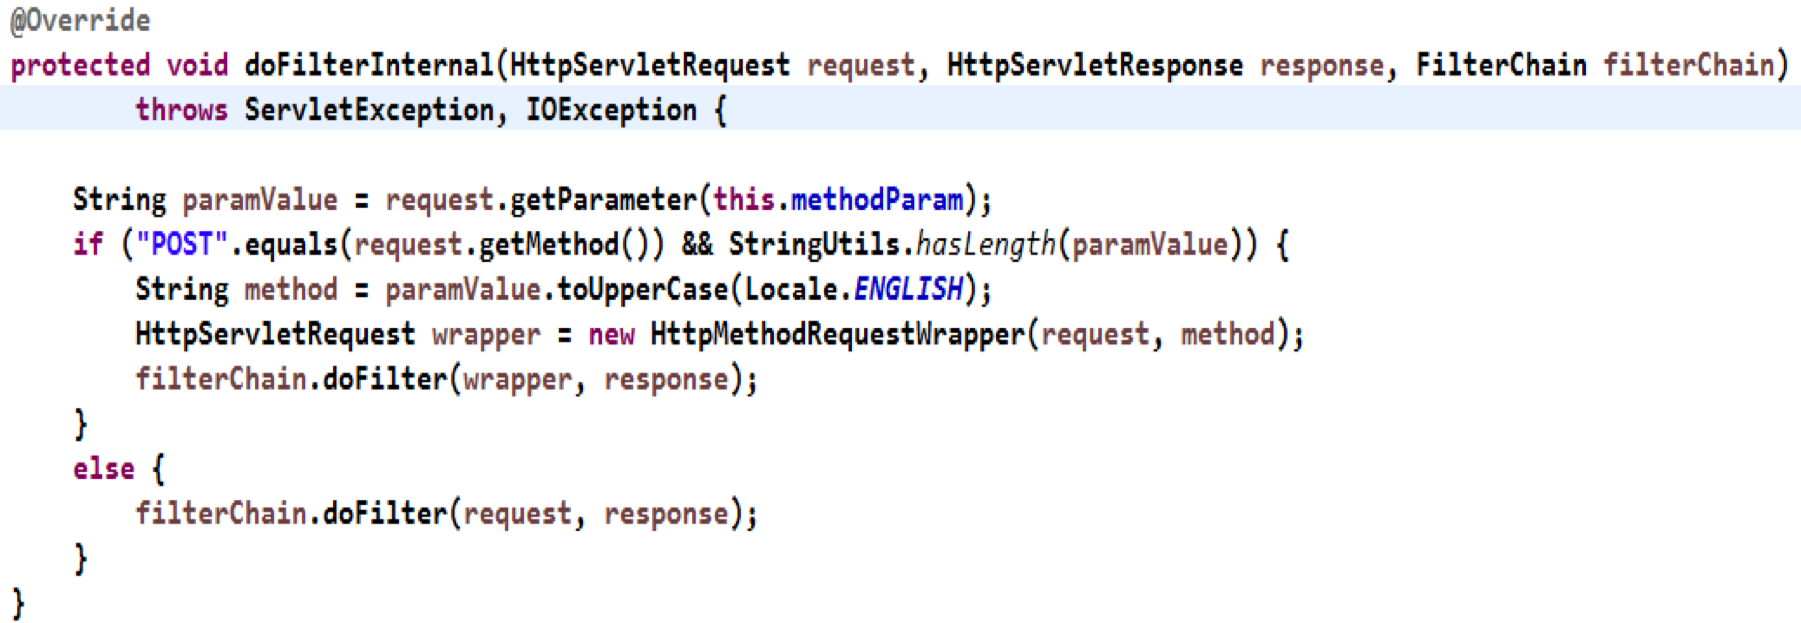
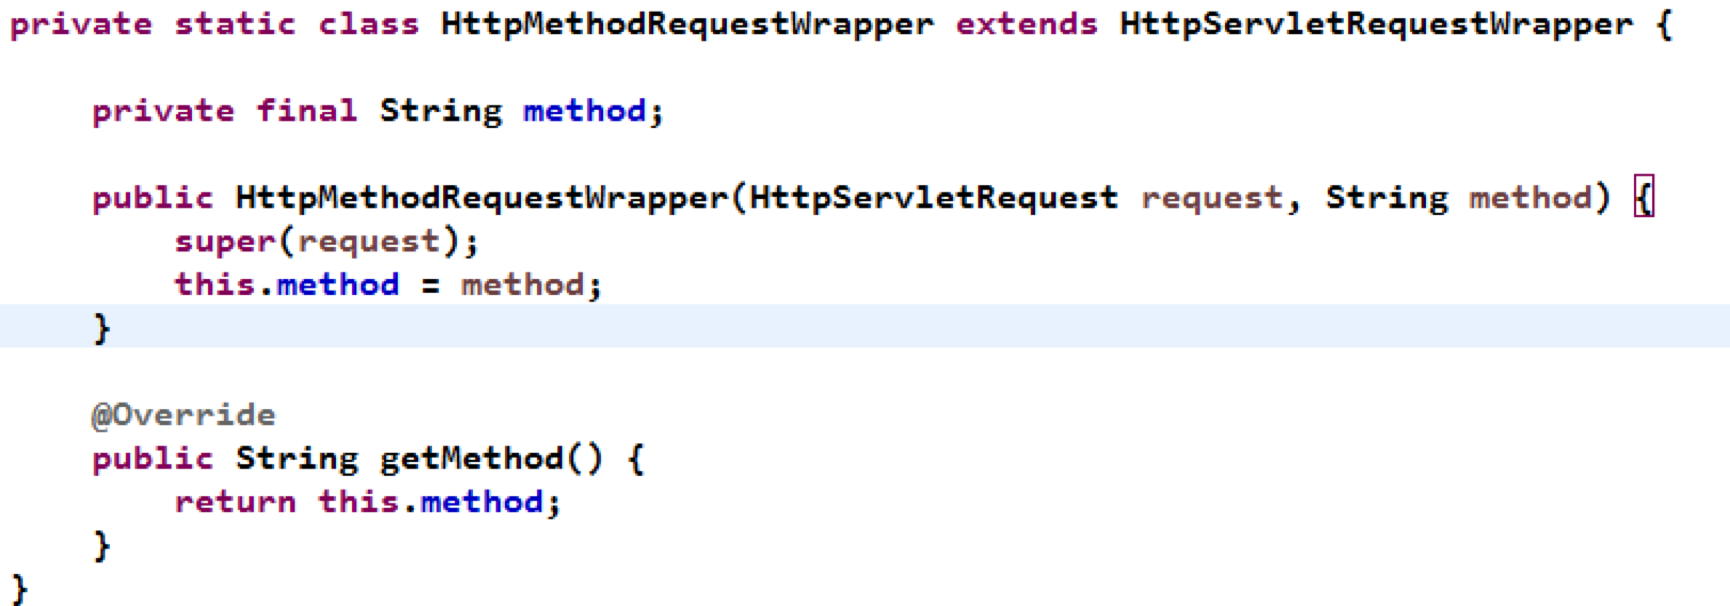
浏览器 form 表单只支持 GET 与 POST 请求,而DELETE、PUT 等 method 并不支持,Spring3.0 添加了一个过滤器,可以将这些请求转换为标准的 http 方法,使得支持 GET、POST、PUT 与 DELETE 请求。即,若是 POST 请求,且参数中有 _method 参数,那么经过转换真正的请求方式就是 _method 的值。
源码分析
指定参数为 _method

hiddenHttpMethodFilter 获取 _method 参数的值。并判断如果是 POST 请求,且 _method 的值不为空

那么就将 POST 请求替换为 _method 的值的请求(getMethod的返回值为 _method 的值。即将请求方式进行转换)

REST CRUD 操作
web.xml 新增 HiddenHttpMethodFilter 配置
1
2
3
4
5
6
7
8
9
|
<filter>
<filter-name>HiddenHttpMethodFilter</filter-name>
<filter-class>org.springframework.web.filter.HiddenHttpMethodFilter</filter-class>
</filter>
<filter-mapping>
<filter-name>HiddenHttpMethodFilter</filter-name>
<url-pattern>/*</url-pattern>
</filter-mapping>
|
1
2
3
4
5
6
7
8
9
10
11
12
13
14
15
16
17
18
19
20
21
22
23
24
25
26
27
28
29
30
| <%@ page language="java" contentType="text/html; charset=UTF-8"
pageEncoding="UTF-8"%>
<!DOCTYPE html>
<html>
<head>
<meta charset="UTF-8">
<title>Insert title here</title>
</head>
<body>
<a href="testREST/1001">测试 GET 请求</a>
<hr/>
<form action="testREST" method="POST">
<input type="submit" value="测试 POST 请求"/>
</form>
<hr/>
<form action="testREST" method="POST">
<input type="hidden" name="_method" value="PUT"/>
<input type="submit" value="测试 PUT 请求"/>
</form>
<hr/>
<form action="testREST/1001" method="POST">
<input type="hidden" name="_method" value="DELETE"/>
<input type="submit" value="测试 DELETE 请求"/>
</form>
</body>
</html>
|
1
2
3
4
5
6
7
8
9
10
11
12
13
14
15
16
17
18
19
20
21
22
23
24
25
26
27
28
29
30
31
32
33
34
| package com.atguigu.controller;
import org.springframework.stereotype.Controller;
import org.springframework.web.bind.annotation.PathVariable;
import org.springframework.web.bind.annotation.RequestMapping;
import org.springframework.web.bind.annotation.RequestMethod;
@Controller
public class RESTController {
@RequestMapping("/testREST/{id}")
public String name(@PathVariable("id") String id) {
System.out.println("GET, ID=" + id);
return "success";
}
@RequestMapping(value = "/testREST", method = {RequestMethod.POST})
public String name1() {
System.out.println("POST");
return "success";
}
@RequestMapping(value = "/testREST", method = {RequestMethod.PUT})
public String name2() {
System.out.println("PUT");
return "success";
}
@RequestMapping(value = "/testREST", method = {RequestMethod.DELETE})
public String name3(@PathVariable("id") String id) {
System.out.println("DELETE");
return "success";
}
}
|
获取客户端数据
RequestParam
在处理请求的方法中,加入相对应的形参,保证形参参数名和传递的数据的参数名保持一致,就可以自动赋值。 如果形参参数名和传递的数据的参数名不一致,那么可以使用 @RequestParam 进行设置。
@RequestParam 可以设置 required 属性。表示该参数是否必须。
@RequestParam 可以设置 defaultValue 属性。表示该参数没传递时(注意是没传递,也就是 null 的时候,并不是为空字符串的时候)的默认值。
1
2
3
4
5
6
7
8
9
10
11
12
13
14
15
16
17
18
19
20
21
22
23
24
25
26
27
28
29
30
31
| <%@ page language="java" contentType="text/html; charset=UTF-8"
pageEncoding="UTF-8"%>
<!DOCTYPE html>
<html>
<head>
<meta charset="UTF-8">
<title>Insert title here</title>
</head>
<body>
<form action="param" method="POST">
password: <input type="text" name="password"/> <br/>
age: <input type="text" name="age"/> <br/>
address: <input type="text" name="address"/> <br/>
province: <input type="text" name="province"/> <br/>
city: <input type="text" name="city"/> <br/>
country: <input type="text" name="country"/> <br/>
<input type="submit" value="添加"/>
</form>
<hr/>
<form action="param2" method="POST">
<input type="submit" value="添加"/>
</form>
<hr/>
<form action="param3" method="POST">
<input type="submit" value="添加"/>
</form>
</body>
</html>
|
1
2
3
4
5
6
7
8
9
10
11
12
13
14
15
16
17
18
19
20
21
| package com.atguigu.controller;
import org.springframework.stereotype.Controller;
import org.springframework.web.bind.annotation.RequestMapping;
import org.springframework.web.bind.annotation.RequestMethod;
import org.springframework.web.bind.annotation.RequestParam;
@Controller
public class ParamController {
@RequestMapping(value = "/param", method = {RequestMethod.POST})
public String param(@RequestParam(value = "name", required = false, defaultValue = "admin") String username, String password, String age) {
System.out.println(" username:" +username + " password:" + password + " age:" + age);
return "success";
}
}
|
1
2
3
4
5
6
7
8
9
|
@RequestMapping(value = "/param2", method = {RequestMethod.POST})
public String param2(@RequestHeader(value = "User-Agent") String userAgent) {
System.out.println("User-Agent: " + userAgent);
return "success";
}
|
CookieValue
1
2
3
4
5
6
7
8
9
|
@RequestMapping(value = "/param3", method = {RequestMethod.POST})
public String param3(@CookieValue(value = "JSESSIONID") String sessionId) {
System.out.println("sessionId: " + sessionId);
return "success";
}
|
POJO 作为参数
新建 User 类
1
2
3
4
5
6
7
8
9
10
11
12
13
14
15
16
17
18
19
20
21
22
23
24
25
26
27
28
29
30
31
32
33
34
35
36
37
38
39
40
41
42
43
44
45
46
47
48
49
50
51
52
53
54
55
56
| package com.atguigu.bean;
public class User {
private Integer id;
private String username;
private String password;
private Integer age;
private Address address;
public Integer getId() {
return id;
}
public void setId(Integer id) {
this.id = id;
}
public String getUsername() {
return username;
}
public void setUsername(String username) {
this.username = username;
}
public String getPassword() {
return password;
}
public void setPassword(String password) {
this.password = password;
}
public Integer getAge() {
return age;
}
public void setAge(Integer age) {
this.age = age;
}
public Address getAddress() {
return address;
}
public void setAddress(Address address) {
this.address = address;
}
@Override
public String toString() {
return "User [id=" + id + ", username=" + username + ", password=" + password + ", age=" + age + ", address="
+ address + "]";
}
public User(Integer id, String username, String password, Integer age, Address address) {
super();
this.id = id;
this.username = username;
this.password = password;
this.age = age;
this.address = address;
}
public User() {
super();
}
}
|
新建 Address 类
1
2
3
4
5
6
7
8
9
10
11
12
13
14
15
16
17
18
19
20
21
22
23
24
25
26
27
28
29
30
| package com.atguigu.bean;
public class Address {
private String province;
private String city;
private String country;
public String getProvince() {
return province;
}
public void setProvince(String province) {
this.province = province;
}
public String getCity() {
return city;
}
public void setCity(String city) {
this.city = city;
}
public String getCountry() {
return country;
}
public void setCountry(String country) {
this.country = country;
}
@Override
public String toString() {
return "Address [province=" + province + ", city=" + city + ", country=" + country + "]";
}
}
|
表单提交值
1
2
3
4
5
6
7
8
9
| <form action="param4" method="post">
username:<input type="text" name="username" /><br />
password:<input type="text" name="password" /><br />
age:<input type="text" name="age" /><br />
province:<input type="text" name="address.province" /><br />
city:<input type="text" name="address.city" /><br />
country:<input type="text" name="address.country" /><br />
<input type="submit" value="添加" />
</form>
|
Controller 获取
可以使用 POJO 获取客户端数据,要求实体类对象中的属性名一定要和页面中表单元素的 name 属性值一致。且支持级联关系
1
2
3
4
5
6
7
8
9
|
@RequestMapping(value = "/param4", method = {RequestMethod.POST})
public String param4(User user) {
System.out.println("user: " + user);
return "success";
}
|
获取 Servlet API
可以通过形参的方式获取 Servlet API。支持 HttpServletRequest,HttpServletResponse,HttpSession, java.security.Principal,Locale,InputStream,OutputStream,Reader,Writer。
1
2
3
4
5
6
7
8
|
@RequestMapping(value = "/param4", method = {RequestMethod.POST})
public String param4(User user, HttpServletRequest request) {
System.out.println(request.getParameter("username"));
return "success";
}
|
处理响应
SpringMVC 处理请求过程中,往作用域中放值有三种方式。分别是 ModelAndView,Model 和 Map。不管是哪种方式最终都会转换为 ModelAndView 的方式进行处理。
ModelAndView
控制器处理方法的返回值如果为 ModelAndView, 则其既包含视图信息,也包含模型数据信息。
1
2
3
4
5
6
7
| @RequestMapping(value = "/param5", method = {RequestMethod.POST})
public ModelAndView param5(User user) {
ModelAndView modelAndView = new ModelAndView();
modelAndView.addObject("username", user.getUsername());
modelAndView.setViewName("success");
return modelAndView;
}
|
Map
1
2
3
4
5
6
7
8
|
@RequestMapping(value = "/param6", method = {RequestMethod.POST})
public String param6(Map<String, Object> map) {
map.put("username", "admin");
return "success";
}
|
Model
1
2
3
4
5
6
7
8
|
@RequestMapping(value = "/param7", method = {RequestMethod.POST})
public String param7(Model model) {
model.addAttribute("username", "admin");
return "success";
}
|
代码地址


